In this article, we will create a simple React Native (with Expo) application using React Navigation, for moving between screens/pages within our app. We will create an app which had a Stack Navigator nested in a Tab Navigator, nested within a Drawer Navigator.
This might sound a bit complicated so let’s take a look gif below.
We have three main pages in the Drawer Navigator Home (purple), Settings (red) and About (blue) pages. Inside the Home page, we have a Tab Navigator which has two pages, PageA (purple) and PageB (green). Within PageA we have a Stack Navigator with two pages Main (purple) and Secondary (yellow).
React Navigation
Is a library that helps you simplify app navigation. The main reason for using this library is because it’s written purely in JavaScript so no native code (Swift/Android) is required to make it work. Also, it’s the recommended navigation library for Expo.
Structure
The project structure will look like this
├── src
│   ├── components
│   ├── views
|   └── MainApp.js
├── package.json
├── App.js
Drawer Navigator
import { Ionicons } from "@expo/vector-icons";
import React from "react";
import { createAppContainer, createDrawerNavigator } from "react-navigation";

import CustomDrawerNavigator from "./components/CustomDrawerNavigator";
import Home from "./views/Home";
import Settings from "./views/Settings";
import About from "./views/About";

const MainNavigator = createDrawerNavigator(
  {
    Home: {
      navigationOptions: {
        drawerIcon: ({ tintColor }) => (
          <Ionicons name="md-home" style={{ color: tintColor }} />
        ),
        drawerLabel: "Home"
      },
      screen: Home
    },

    Settings: {
      navigationOptions: {
        drawerIcon: ({ tintColor }) => (
          <Ionicons name="md-settings" style={{ color: tintColor }} />
        ),
        drawerLabel: "Settings"
      },
      screen: Settings
    },

    About: {
      navigationOptions: {
        drawerIcon: ({ tintColor }) => (
          <Ionicons name="ios-person" style={{ color: tintColor }} />
        ),
        drawerLabel: "About"
      },
      screen: About
    }
  },
  {
    contentComponent: CustomDrawerNavigator
  }
);

const MainApp = createAppContainer(MainNavigator);
export default MainApp;
This is where we create our DrawerNavigator with our three main pages, let’s take a look at a particular page. Here we
give it the key name Home, the drawerIcon relates to what Icon will be shown in the Drawer Navigator, the drawerLabel
is the name of the page, as shown in the image below. Finally, the screen is the actual “jsx” the user sees when they
click on the page. By default, the Home page will be the first page the user sees because it is the first page
defined in the navigator.
Home: {
  navigationOptions: {
    drawerIcon: ({ tintColor }) => (
        <Ionicons name="md-home" style={{ color: tintColor }} />
    ),
    drawerLabel: "Home"
  },
  screen: Home
},

Custom Drawer Navigator
After we’ve defined our three pages we then define a custom Drawer Navigator contentComponent: CustomDrawerNavigator.
This is a component we make ourselves and can style it however we wish.
import React from "react";
import { View } from "react-native";
import { DrawerItems } from "react-navigation";

import styles from "./styles";

const CustomDrawerNavigator = props => (
  <View style={[styles.container]}>
    <DrawerItems
      activeBackgroundColor={"black"}
      activeTintColor={"white"}
      iconContainerStyle={styles.icons}
      {...props}
    />
  </View>
);

export default CustomDrawerNavigator;
Here the DrawerItems are the three pages we’ve defined above. We give the active page, the page the user is currently
on, a background of black and a colour of white (the text). The line {...props} is using the
spread operator (…),
so we don’t have to rewrite all the props passed by React Navigation. For example, we have props like onItemPress
or navigation. This is the same Drawer Navigator shown in the image above.
Tab Navigator
So our Tab Navigator allow us to swap pages by changing tabs. The Tab Navigator will be on the home page, so
Home.js has the following code.
import React, { Component } from "react";
import { View } from "react-native";

import CustomTabNavigator from "../components/CustomTabNavigator";
import CustomHeader from "../components/CustomHeader";

export default class Home extends Component {
  static router = CustomTabNavigator.router;

  render() {
    return (
      <View style={{ flex: 1 }}>
        <CustomHeader navigation={this.props.navigation} />
        <CustomTabNavigator navigation={this.props.navigation} />
      </View>
    );
  }
}
Custom Header
Where the custom header looks like so.
import { Ionicons } from "@expo/vector-icons";
import React from "react";
import { View } from "react-native";

import styles from "./styles";

const CustomHeader = ({ navigation }) => (
  <View style={[styles.container]}>
    <Ionicons
      name="md-menu"
      size={32}
      color="black"
      onPress={() => navigation.openDrawer()}
    />
  </View>
);

export default CustomHeader;
This component is just a simple icon, which when pressed, opens the Drawer Navigator using the navigation props we
passed to the component onPress={() => navigation.openDrawer()}.
Note: We could also swipe right to open the Drawer Navigator (from the left hand side of the screen).
In the parameters we use the following syntax ({ navigation }), this is called
destructuring. We can use this with arrays or
objects for example;
const temp = {
  a: 10,
  b: 20,
};

// We could do
const a = temp.a;
const b = temp.b;

// Or
const { a, b } = temp;
We do as similar thing with the props, rather then referring to navigation as props.navigation and passing a
parameter props instead of ({ navigation }), this simplifies our code a little bit and makes it easier to follow.
Custom Tab Navigator
The custom Tab Navigator is similar to the MainApp.js’s Drawer Navigator.
import { createMaterialTopTabNavigator } from "react-navigation";

import PageA from "../../views/Home/PageA";
import PageB from "../../views/Home/PageB";

const CustomTabNavigator = createMaterialTopTabNavigator(
  {
    PageA: {
      navigationOptions: {
        tabBarLabel: "PageA"
      },
      screen: PageA
    },
    PageB: {
      navigationOptions: {
        tabBarLabel: "PageB"
      },
      screen: PageB
    }
  },
  {
    tabBarPosition: "bottom"
  }
);

export default CustomTabNavigator;
We give it the two pages we want to be “navigatable” via tabs in this case PageA and PageB, we then define
the tab to be at the bottom (rather than the top) of the screen. By default PageA will be the page we
visit when we go Home page because it’s the first page defined in the Tab Navigator.
Stack Navigator
In this example, PageB (second page on Tab Navigator) is just a simple page. The stack navigator exists on
PageA.
import { createStackNavigator } from "react-navigation";

import Main from "./PageA/Main";
import Secondary from "./PageA/Secondary";

const PageANavigator = createStackNavigator({
  Main: {
    navigationOptions: {
      header: null
    },
    screen: Main
  },

  Secondary: {
    navigationOptions: {
      header: null
    },
    screen: Secondary
  }
});

PageANavigator.navigationOptions = ({ navigation }) => ({
  tabBarVisible: navigation.state.index === 0,
  swipeEnabled: navigation.state.index === 0
});

export default PageANavigator;
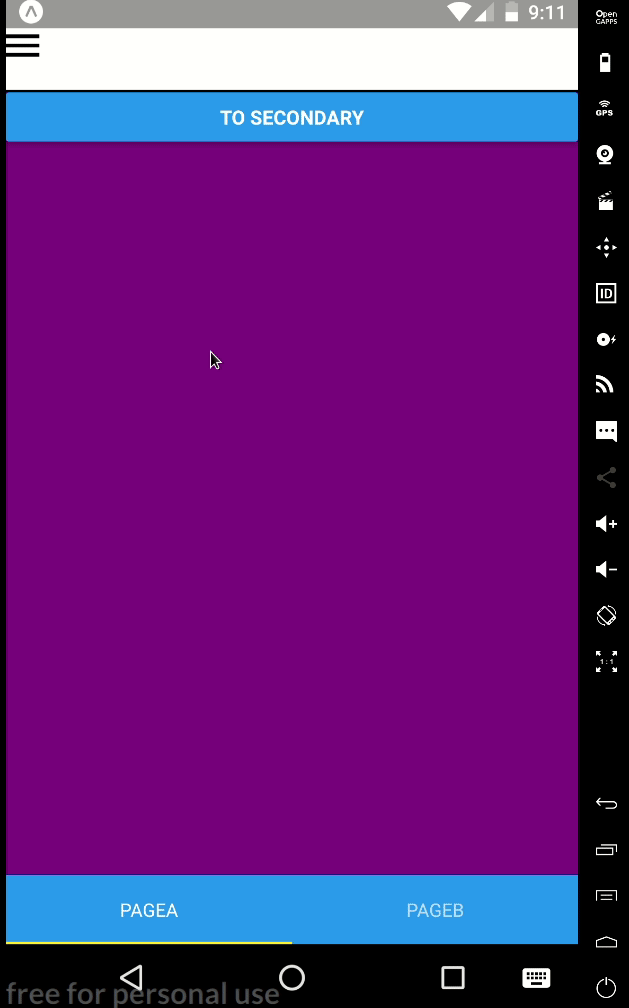
Again this is very similar to our other navigators we’ve defined. Here we define two pages that we can navigate between,
like before the Main page is the page we visit by default. So the first page the user will see when you open the app
is the Main page. This is because when the app is first opened we visit the Home page (first in the Drawer Navigator),
which contains PageA (first in Tab Navigator), which contains Main (first in Stack Navigator).
In the code, we set header: null else part of the screen will be taken up by a navigation header, as shown in the
image below.
PageANavigator.navigationOptions = ({ navigation }) => ({
  tabBarVisible: navigation.state.index === 0,
  swipeEnabled: navigation.state.index === 0,
});
The first page in the Stack Navigator (Main) has an index of 0, so navigation.state.index === 0 evaluates as true.
So on the Main page we will see the tab bar and can swipe to change tabs but we cannot do this on the second page
Secondary.
Main
So now we have a Stack Navigator but we have no obvious way to get from Main to Secondary. With the
Drawer Navigator and Tab Navigator, we can press buttons to change.
import React, { Component } from "react";
import { Button, View } from "react-native";

export default class Main extends Component {
  render() {
    return (
      <View style={{ flex: 1, backgroundColor: "purple" }}>
        <Button
          title="To Secondary"
          onPress={() => this.props.navigation.navigate("Secondary")}
        />
      </View>
    );
  }
}
We can do this by creating our button in Main which when pressed navigates us to Secondary page,
onPress={() => this.props.navigation.navigate("Secondary")}. Where “Secondary” is the page name to
change to.
Other Pages
All the other pages are very basic and look something like this, simple background and not much else.
import React, { Component } from "react";
import { View } from "react-native";

import CustomHeader from "../components/CustomHeader";

export default class Settings extends Component {
  render() {
    return (
      <View style={{ flex: 1, backgroundColor: "red" }}>
        <CustomHeader navigation={this.props.navigation} />
      </View>
    );
  }
}
Appendix
- Example source code
- React Navigation
- Genymotion emulator
- GIFs created with screentogif