A bit of backstory when I first started developing React Native apps, I found there weren’t
any good example of Gitlab CI files. So in this article, I will show you an example .gitlab-ci.yml
file you can use with your React Native app. You can of course tweak and makes changes as required by your
project.
CI/CD
Before we dive straight into the CI file itself, let’s do a quicker refresher on some basic concepts. Feel free to skip this section if you are already familiar with CI/CD, Git and Gitlab CI.
Continuous Integration (CI), is typically defined as making sure all code being integrated into a codebase works. It usually involves running a set of jobs referred to as a CI pipeline. Some jobs we may run include linting our code and running unit tests. This is usually done automatically using a tool such as Travis, Circle or even Gitlab.
One particularly useful use case for this is when others are adding new features to our codebase and we want to check it still works. We can create a CI pipeline that will run unit tests against the new code automatically when a pull request (GitHub) or merge request (Gitlab) is opened. This saves us a lot of time, rather than having to copy the new features/code and then run the tests our selves on our machine.
Continuous Delivery (CD), is typically an extension of CI to make sure that you can release new changes quickly. This means automating your release process, such that you can deploy your application at any point of time just by clicking on a button.
Continuous Deployment takes CD one step further by requiring no human intervention in deploying our application. You can read more about this here.
Git
Git is a version control system (VCS), it is heavily tied in with CI.
In git, we can make “commits” which are snapshots of our project at its current state. We can later revert back to older commits and
compare files between commits (and much more). Usually every commit we push to Gitlab triggers a CI pipeline run against that current commit.
Git also has this concept of branches, where usually the master branch contains our production-ready code and the other branches have
new features being worked on. When our feature branches are ready they are merged into the master branch. Usually, the CI pipeline needs
to be successfully running (green ticks) before this can happen, however.
Gitlab CI
Gitlab CI, is defined as a YAML file. In the file, we define “jobs” which can do various
different task. You can read more here.
Full reference docs here, which details all the different parameters we
can use. To use Gitlab CI within our projects is very straight forward, create a new file .gitlab-ci.yml in our project
root and then define our jobs (we will see this a bit later in the article).
Example

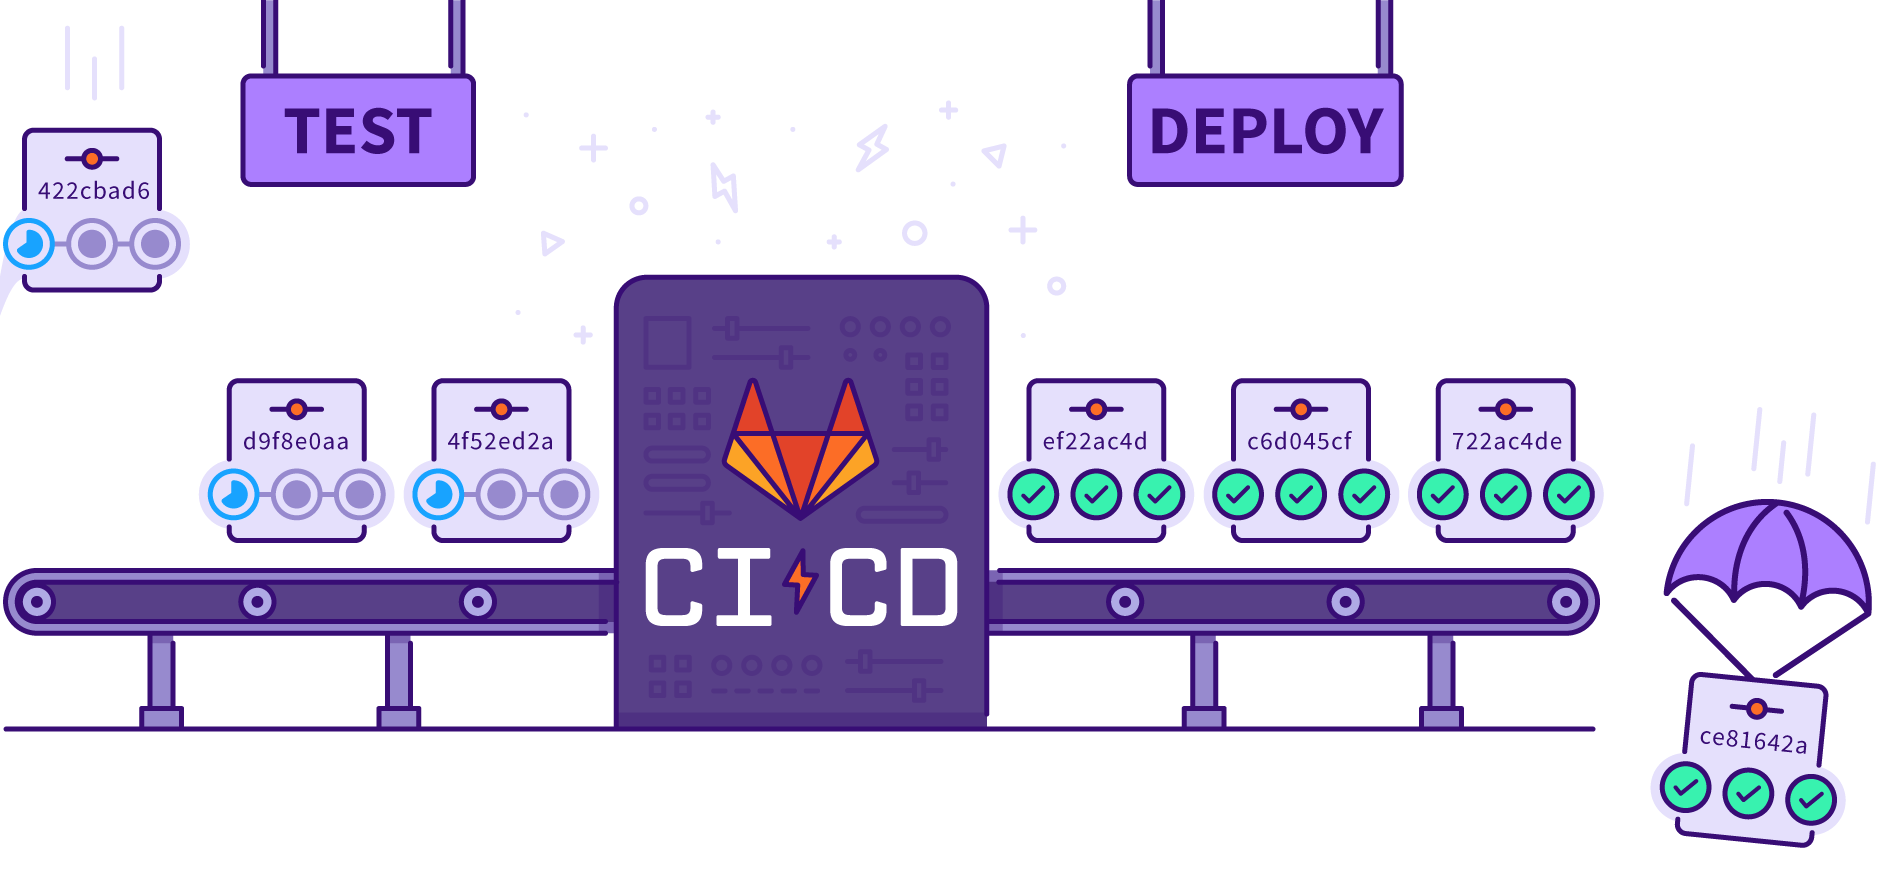
The image above shows an example of a workflow we may use. So we create a new branch for our feature called feature/add-x.
We then create our commits (with our new code) and push them to Gitlab. Open a merge request, this triggers the CI
pipeline (from the .gitlab-ci.yml) file. In this example, the pipeline fails, perhaps because a unit test failed. This
causes the whole pipeline to fail.
We then fix our code so the unit tests pass and then create more commits and push them. This then triggers the
pipeline to run again, this time it passes. Now our code is ready to be reviewed and merged into the main branch.
After the code review, it will be merged onto the master (main) branch. Then we will trigger the deployment process,
this can also be defined within our CI file.
.gitlab-ci.yml
Now onto the real meat and potatoes of this article, our .gitlab-ci.yml file for React Native apps.
Taking a look at an example application. You can find the .gitlab-ci.yml
and package.json in the appendix below or follow the link above. Now let’s take a look the .gitlab-ci.yml file.
setup
image: node:8

stages:
  - pre
  - test
  - publish
  - post

cache:
  key: ${CI_COMMIT_REF_SLUG}
  paths:
    - node_modules/

variables:
  DOCKER_DRIVER: overlay2

before_script:
  - yarn generate-dotenv
  - yarn
First, we specify an image, this is the default docker image we will use for our “jobs”.
Unless a job specifies an image explicitly in its definition it will use this one. In this
example, we will use node 8 it already has node, npm and yarn installed. We could probably
upgrade this to node 10 or even node 12 (long term releases of node).
Next, we define all the stages of our pipeline, any jobs in the same stage will run
in parallel (at the same time). If a job in an earlier stage fails the pipeline won’t carry
on to the next and will stop running at the current stage. The stages defined first such
as pre and test run before stages defined later such as publish.
Each job must be given a stage.
Next, we define a cache, we will cache the node_modules for
future jobs (in this pipeline). Gitlab CI injects some
predefined environment variables,
one of them being CI_COMMIT_REF_SLUG.
We then define a variable DOCKER_DRIVER: overlay2, this helps speed our
docker containers a bit because by default it uses vfs which is slower
learn more here.
Finally, we define before_script which will run before every job unless we specify a
before_script within the jobs themselves. In this example, we install our node_modules
using yarn and create a .env file, we need the .env file for a few our the jobs.
The .env file is used by React Native to set configuration within the app.
{
  "name": "stegappasaurus",
  "scripts": {
    "generate-dotenv": "sh util/generate-dotenv.sh > .env"
  }
}
Where BUGSNAG_API_KEY and CAT_API_KEY are environment variables which are injected by
Gitlab more information here.
#!/usr/bin/env bash

cat  << EOF
BUGSNAG_API_KEY=${BUGSNAG_API_KEY}
CAT_API_KEY=${CAT_API_KEY}
EOF
Where the generated .env file will look like.
BUGSNAG_API_KEY=1232541
CAT_API_KEY=abxc-71379991
jobs
Note: For the example application I am showing it has two branches production (main) and master.
pre
Now, let’s take a look at our jobs in the CI file. The first job is used to close issues automatically on Gitlab if there is an issue number in the git commit. It uses the following tool gitlab-auto-close-issue. Which provides a docker image which contains the script to auto-close your issues. It will also remove labels from the issue if you want such as “Doing”. This job is only run on the master branch of our project.
Since we don’t need to install any dependencies to run the job before_script: [] is an empty
list, therefore the default before_script defined above won’t run in this job. Also since
we define a docker image within the job we don’t use the default docker image node:8.
close:issue:
  image: registry.gitlab.com/gitlab-automation-toolkit/gitlab-auto-close-issue
  stage: pre
  before_script: []
  only:
    - master
  script:
    - apk add --no-cache --upgrade grep
    - ISSUE=$(echo $CI_COMMIT_MESSAGE | grep -oP "(?<=Fixes \#)[0-9]+" || echo '1')
    - gitlab_auto_close_issue --issue $ISSUE --remove-label "Doing" --remove-label "To Do"
The next job automatically creates a merge request (MR) if the commits are not being pushed to master or production branches.
It will create an MR as WIP with a template we defined in the .gitlab folder. We also set the option --use-issue-name
where if we have a branch called say feature/#211 where #211 is an issue number (for that project). It will take
certain bits of information from that issue and set it on the MR such as labels.
More information about the tool gitlab-auto-mr.
create:merge-request:
  image: registry.gitlab.com/gitlab-automation-toolkit/gitlab-auto-mr
  stage: pre
  before_script: []
  except:
    - production
    - master
    - tags
  script:
    - gitlab_auto_mr -t master -c WIP -d .gitlab/merge_request_templates/merge_request.md -r -s --use-issue-name
Where the template could look something like this.
# Description

<!-- please include a summary of the change and which issue is fixed. Please also include relevant motivation and context. List any dependencies that are required for this change. -->

## Type

- [ ] Bug Fix
- [ ] Improvement
- [ ] New Feature

Fixes #<!-- Issue Number -->
test
This job called lint only runs on MRs not on the master branch i.e. it won’t run if create an MR from master to production.
Hence the except clause. Finally we run the lint command which is defined in our package.json file as eslint src/**/*.{ts,tx,tsx}.
This will run eslint against all of the code within our src folder.
lint:
  stage: test
  only:
    - merge_requests
  except:
    variables:
      - $CI_COMMIT_REF_NAME =~ /^master/
  script:
    - yarn lint
Then lint:code-formatter checks our code against prettier and see’s if it’s compliant with the code formatter.
lint:code-formatter:
  stage: test
  only:
    - merge_requests
  except:
    variables:
      - $CI_COMMIT_REF_NAME =~ /^master/
  script:
    - yarn code-formatter-check
Then we check all of our TS is valid, by running tsc --project . --noEmit --pretty --skipLibCheck.
To make sure there aren’t any type mismatches.
lint:types:
  stage: test
  only:
    - merge_requests
  except:
    variables:
      - $CI_COMMIT_REF_NAME =~ /^master/
  script:
    - yarn types-check
We run our unit tests using jest (our test runner). We also use the --silent flag to
hide various warnings raised by components we are testing. Like all the other jobs in this stage we
only run this job in an MR.
tests:unit:
  stage: test
  only:
    - merge_requests
  except:
    variables:
      - $CI_COMMIT_REF_NAME =~ /^master/
  script:
    - yarn tests --silent
Finally, almost the same as the job above, except it only runs on the master branch it gets the
code coverage from unit tests and stores the result using coverage (with some Regex). Where the coverage script is
defined as jest --coverage in package.json. More information here.
The code coverage can be shown on a badge, such as here.
tests:coverage:
  stage: test
  only:
    - master
  script:
    - yarn coverage --silent
  coverage: /All\sfiles.*?\s+(\d+.\d+)/
publish
Then on to our next stage. The job below actually publishes our app to the Play Store. It will only run when we’ve
tagged one of our commits for release i.e. release/1.0.0. This will only be done on the production branch.
We are also using another docker image which has Android and various our dependencies need for our React Native app.
I won’t do a massive deep dive into this job because I’ve already written an article about it
here.
But essentially what happens is we have various variables defined in our project in Gitlab such as our Keystore stored
in base64 and the Keystore setting such as the username and password.
To use the tool to auto-publish our app I need to have a play-store.json file and because my app uses react-native-firebaseI need agoogle-services.json` file.
I then generate a licenses.json file using the following command npm-license-crawler -onlyDirectDependencies --omitVersion -json src/data/licenses.json,
there is a license view within my application which lists all of the main dependencies so I can properly credit those libraries this task generates that file.
I then generate a gradle.propeties file using sh util/generate-gradle-properties.sh > android/gradle.properties.
Very similar to the .env the script we looked at above. Where the file looks something like:
#!/usr/bin/env bash

cat  << EOF
android.useAndroidX=true
android.enableJetifier=true
org.gradle.jvmargs=-Xms1g
MYAPP_RELEASE_STORE_FILE=stegappasaurus.keystore
MYAPP_RELEASE_STORE_PASSWORD=${ANDROID_KEYSTORE_PASSWORD}
MYAPP_RELEASE_KEY_ALIAS=${ANDROID_KEYSTORE_ALIAS}
MYAPP_RELEASE_KEY_PASSWORD=${ANDROID_KEYSTORE_KEY_PASSWORD}
EOF
This means we can reference the variables for the keystore within our build.gradle files without needing to hardcode
the values and once again this file is generated from CI variables stored on the project itself. For example the
app/build.gradle I have the following defined.
android {
    signingConfigs {
        release {
            if (project.hasProperty("MYAPP_RELEASE_STORE_FILE")) {
                storeFile file(MYAPP_RELEASE_STORE_FILE)
                storePassword MYAPP_RELEASE_STORE_PASSWORD
                keyAlias MYAPP_RELEASE_KEY_ALIAS
                keyPassword MYAPP_RELEASE_KEY_PASSWORD
            }
        }
    }
}
We then publish the application using publish-package script which runs yarn run bundle && bash util/publish-package.sh.
Where publish-package.sh looks like
#!/usr/bin/env bash

echo $CI_COMMIT_TAG

if [[ $CI_COMMIT_TAG == *"alpha"* ]]; then
    echo "Publishing Package: Alpha"
    cd android && ./gradlew publish --track alpha
elif [[ $CI_COMMIT_TAG == *"beta"* ]]; then
    echo "Publishing Package: Beta"
    cd android && ./gradlew publish --track beta
elif [[ $CI_COMMIT_TAG == *"release"* ]]; then
    echo "Publishing Package: Production"
    cd android && ./gradlew publish --track production
else
    echo "Publishing Package: Internal"
    cd android && ./gradlew publish --track internal
fi
If the git tag is release/1.0.0 then we will publish this directly onto the production track. It also
check if the tag contains alpha or beta if so then we publish it to different tracks.
echo "Publishing Package: Production"
cd android && ./gradlew publish --track production
Finally we make the assets and build folders available as
artifacts for jobs in future stages.
publish:android:package:
  stage: publish
  image: reactnativecommunity/react-native-android
  only:
    - /^release/.*$/
  script:
    - echo fs.inotify.max_user_watches=524288 | tee -a /etc/sysctl.conf && sysctl -p
    - cd android
    - base64 -d $ANDROID_KEYSTORE > app/stegappasaurus.keystore
    - export VERSION=$(cat app.json | jq -r .version)
    - cat $PLAY_STORE_JSON > app/play-store.json
    - cat $FIREBASE_GOOGLE_SERVICES_JSON > app/google-services.json
    - yarn generate-licenses
    - yarn generate-gradle-properties
    - yarn publish-package --no-daemon
  artifacts:
    paths:
      - ./android/app/build/
      - ./android/app/src/main/assets/
post
Onto our final stage, the first job creates a Gitlab release. This job is again only run on release tags, but only
for “final” release hence the except clause. It won’t run if the git tag contains beta or alpha in its name.
The gitlab-auto-release tool much like the other
tools above is used to automate this part of the Gitlab workflow.
The script also can use CHANGELOG.md, if it follows
keepachangelog format. It takes the changelog from that
file and copies into our release. Only for the matching version name i.e. release/1.0.0, would look for 1.0.0 in our changelog file.
You can find an example release created by this script here.
Also if you specify a job name after the --artifacts argument it will link that jobs artifacts in this release (if it was run in the
same pipeline as this job). In this example, we want to include our Android app build (APK/AAB).
create:gitlab:release:
  image: registry.gitlab.com/gitlab-automation-toolkit/gitlab-auto-release
  stage: post
  only:
    - /^release/.*$/
  except:
    variables:
      - $CI_COMMIT_TAG =~ /beta/
      - $CI_COMMIT_TAG =~ /alpha/
  before_script: []
  script:
    - gitlab_auto_release -c CHANGELOG.md -d "This was auto-generated by the gitlab-auto-release tool, https://gitlab.com/gitlab-automation-toolkit/gitlab-auto-release." --artifacts "publish:android:package"
Our final job in this stage again only runs on release tags. It publishes our source maps to Bugsnag.
Which is a bug tracking tool. When our app is published to the Play store the JavaScript is minified and so Bugsnag cannot
give us a proper stack trace without the source maps. We must “tag” each upload with a version, hence we look in app.json file
for the current app version. This job requires artifacts from the previous android publishing job publish:android:package,
hence we mark it a dependency in dependencies. We need access to the bundle generated in the assets folder from the
previous job. Rather than repeat the same “actions” here to generate the files we need.
To speed up our CI we will just “copy” the files into the job by using artifacts.
publish:bugsnag:soucemaps:
  stage: post
  only:
    - /^release/.*$/
  script:
    - apt update && apt install -y jq
    - export VERSION=$(cat app.json | jq -r .version)
    - curl https://upload.bugsnag.com/react-native-source-map -F apiKey=${BUGSNAG_API_KEY} -F appVersion=${VERSION} -F dev=false -F platform=android -F sourceMap=@android/app/src/main/assets/index.map -F bundle=@android/app/src/main/assets/index.bundle -F projectRoot=`pwd`
    - yarn run bugsnag-sourcemaps upload --api-key=${BUGSNAG_API_KEY} --app-version=${VERSION} --minifiedFile=android/app/build/generated/assets/react/release/index.android.bundle --source-map=android/app/build/generated/sourcemaps/react/release/index.android.bundle.map --minified-url=index.android.bundle --upload-sources
  dependencies:
    - publish:android:package
other
Finally, we have a Gitlab defined job called pages, where using Gitlab pages we will publish documentation
for this application. It will publish a static website present in the public. The documentation is built
using docz. By default, you can access pages at https://hmajid2301.gitlab.io/stegappasaurus,
i.e. username.gitlab.io/project_name but I have a google domain and using a CNAME you can also view the
website on https://stegappasaurus.haseebmajid.dev/.
Since this is a special job this job is run at the very end of our pipeline, also this job on runs on the
master branch.
pages:
  only:
    - master
  before_script:
    - yarn
  script:
    - yarn docs-build
    - mv .docz/dist/* public/
  artifacts:
    paths:
      - public
Finally it’s done! That’s it! That is one example of a .gitlab-ci.yml file you can use to for
your React Native projects.