In this article I will show you how you can deploy a Docz website on Gitlab pages, using .gitlab-ci.yml.
Most of this article should be applicable to Github pages as well.
Docz
Docz is a tool powered by Gatsby, it aims to make it easier to document your project.
It uses a language called mdx which is like normal markdown with some extra features, i.e. md + jsx. The main
advantage of using Docz is you can render components “live”, if you put them with the <playground> tags. A basic
example may look like this:
---
name: Button
route: /
---

import { Playground, Props } from 'Docz'
import { Button } from './'

# Button

<Props of={Button} />

## Basic usage

<Playground>
  <Button>Click me</Button>
  <Button kind="secondary">Click me</Button>
</Playground>
I chose to use Docz because it was simple to set up and looks very nice. I was already writing my documentation
in markdown so it seemed like a perfect fit, even though in my use case I didn’t use the playground to render
components.
Example
You can find an example project using Docz here. This is one of my projects where I deployed the documentation using Gitlab Pages. You can find it here.
Getting Started
Ok, now let’s get into how we can add Docz to an existing project. We also need to have react-dom and react
installed.
yarn add Docz

# or

npm install Docz
So our package.json looks like:
{
  "name": "example_app",
  "scripts": {
    "docs-dev": "docz dev",
    "docs-build": "docz build"
  },
  "dependencies": {
    "Docz": "2.2.0",
    "react": "16.9.0",
    "react-dom": "16.8.0"
  }
}
We then need to create our Doczrc.js configuration file, like so:
export default {
  src: "docs",
  description: "Example Documentation",
  menu: ["Introduction", "Contributing"],
  themeConfig: {
    initialColorMode: "dark",
  },
};
We will keep all our .mdx files in a folder called docs hence src: 'docs'. Each file will be shown as a page on
our website. The description option will be the name of our website in an open browser tab. The menu option is
the order in which our pages will show up in the sidebar (on the left-hand side by default). The names used in this
menu option must match the names used in the frontmatter of that file should match the front matter in mdx pages.
Finally, I want to use the dark mode by default which is the final option.
---
name: Button
route: /
---
We can view our current docz website by running docs-dev and then go to localhost:3000 on our dev machine.
Adding Pages
Ok, now let’s add our actual “pages” to our Docz website. First create a new folder called docs in your project root.
Then we will create our first page called Introduction.mdx (this name doesn’t matter so much), where the page’s contents
look something like:
---
name: Introduction
route: /
---

# Example

Welcome to this example app, in this app we will show examples.
Note: The front matter
namemust match the name we defined in theDoczrc.jsmenu option.
The route defines the path the user will see, i.e. in the stegappasaurus example this page will be shown on
https://stegappasaurus.haseebmajid.dev/.
Next let’s create a second page called Contributing.mdx, which looks like:
---
name: Contributing
route: /contributing
---

# Contributing

Three main ways to contribute to this project are;

- **Adding a new feature:** Adding a new feature to the project, such as allow encoding of audio files alongside images
- **Improving a feature:** Extend/improve an existing feature, such as a small UI change
- **Fix an issue:** We have a list of [issues](https://gitlab.com/hmajid2301/stegappasaurus/issues), or you can fix your issue.
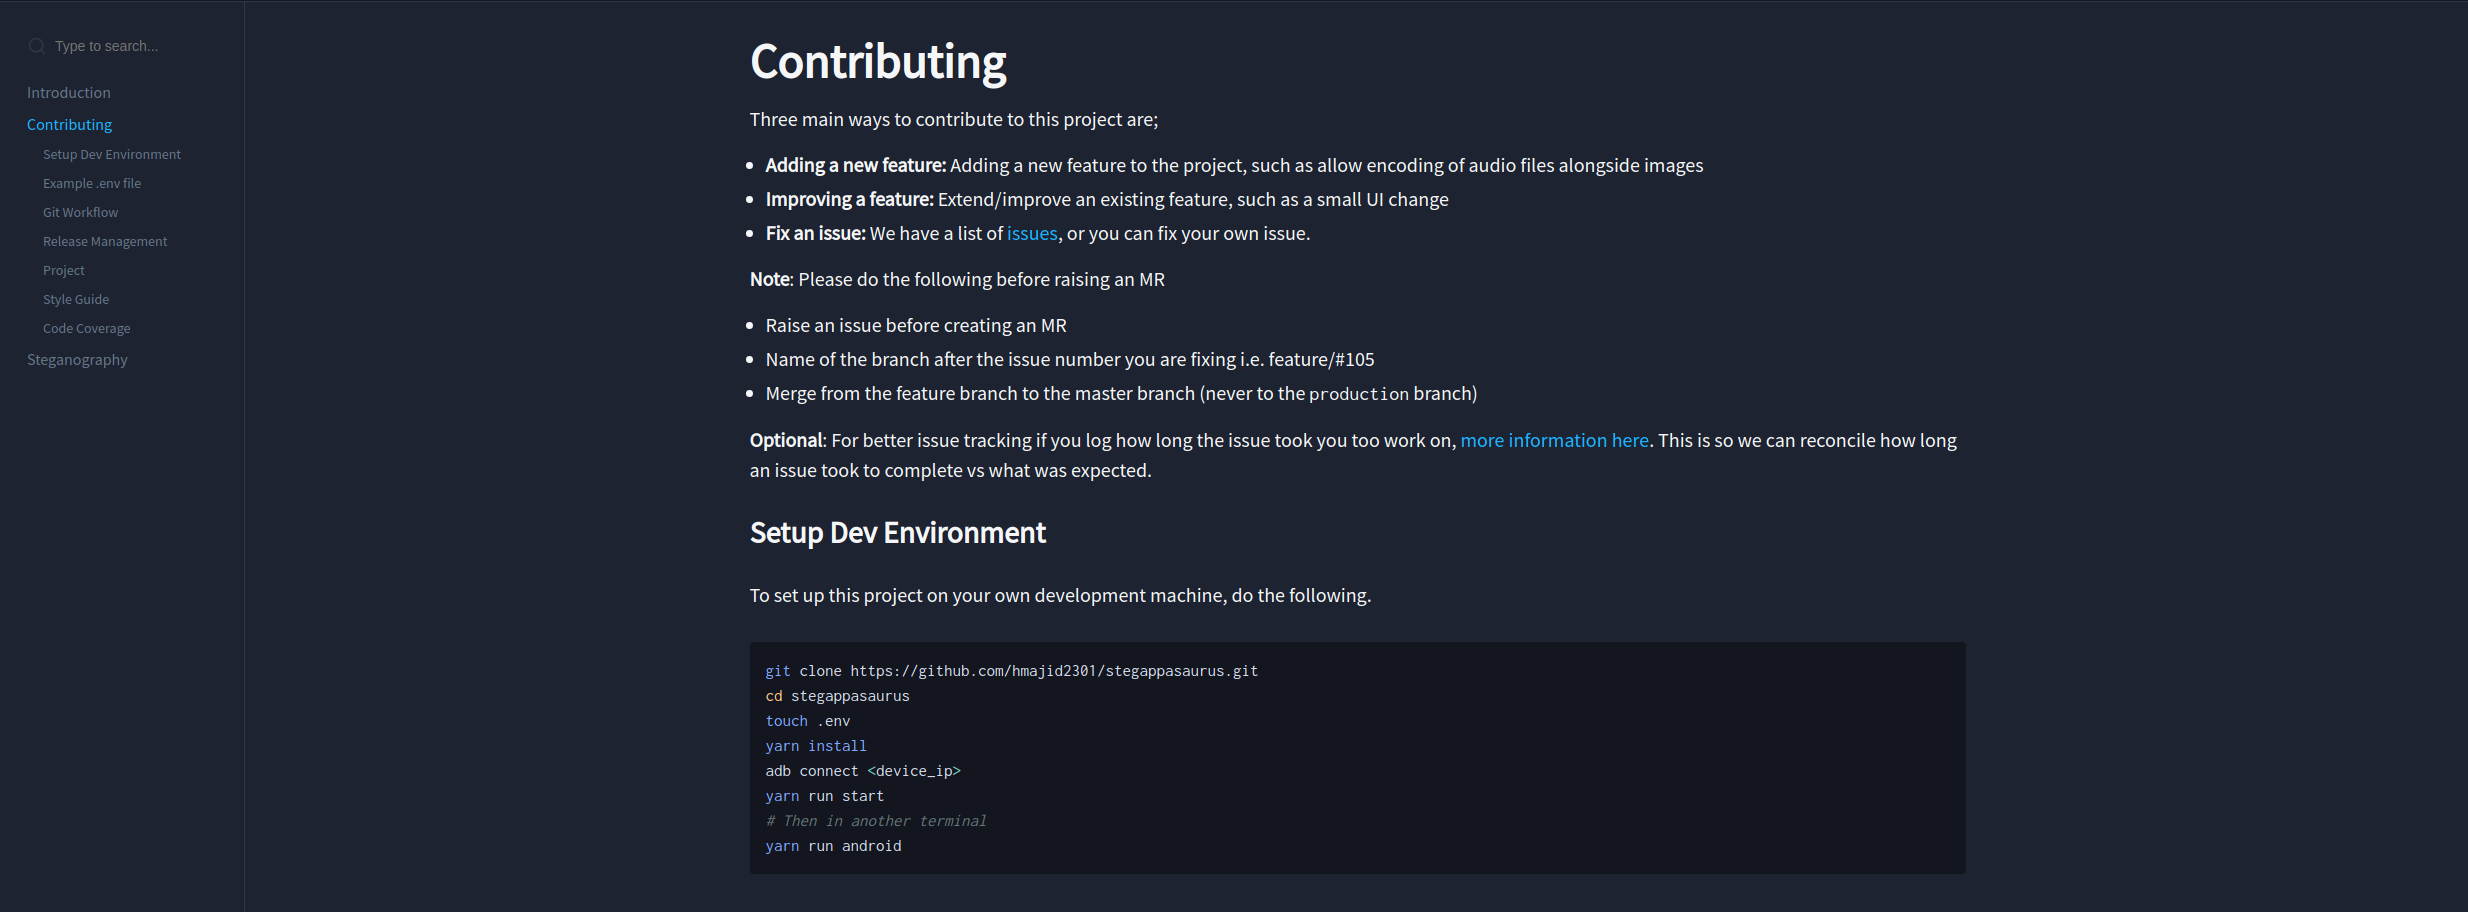
This page can be found on /contributing i.e. https://stegappasaurus.haseebmajid.dev/contributing. The page may look
something like the image below. The titles are shown as sub-menus.
Gitlab Pages
Now that we have our Docz website and it is working locally, how can we deploy on Gitlab pages for all the world to see?
Well first we need to add a job titled pages to our .gitlab-ci.yml file, then we need to store all of our
static assets in a folder called public and make that an artifact of this job. This will tell Gitlab CI, that we
want to publish this “website” to Gitlab Pages. Here is an example of what it may look like:
pages:
  only:
    - master
  script:
    - yarn
    - yarn docs-build
    - mv .Docz/dist/* public/
  artifacts:
    paths:
      - public
This will publish our “website” to https://hmajid2301 and my project name is stegappasaurus hence the website URL is https://hmajid2301.gitlab.io/stegappasaurus.
Custom Domain (Optional)
If you have your own custom domain, you can “host” the page under two URLs. In my case, I own haseebmajid.dev and I
wanted to host it under a subdomain within that domain, like so https://stegappasaurus.haseebmajid.dev/. Gitlab
makes this surprisingly easy to do:
Note: In this example, I am assuming we are using a subdomain and not the root domain i.e. example_app.haseebmajid.dev not haseebmajid.dev.
- First go to your project on Gitlab
- Next Settings (Left sidebar) > Pages > New Domain (Top Righthand Corner)
- Enter the domain name you’d like to use, i.e. example_app.haseebmajid.dev
- Press
Create New Domain - Copy the
TXTrecord to verify ownership. - Next go your domain provider, in my case it’s Google
- Go to your DNS settings for that domain
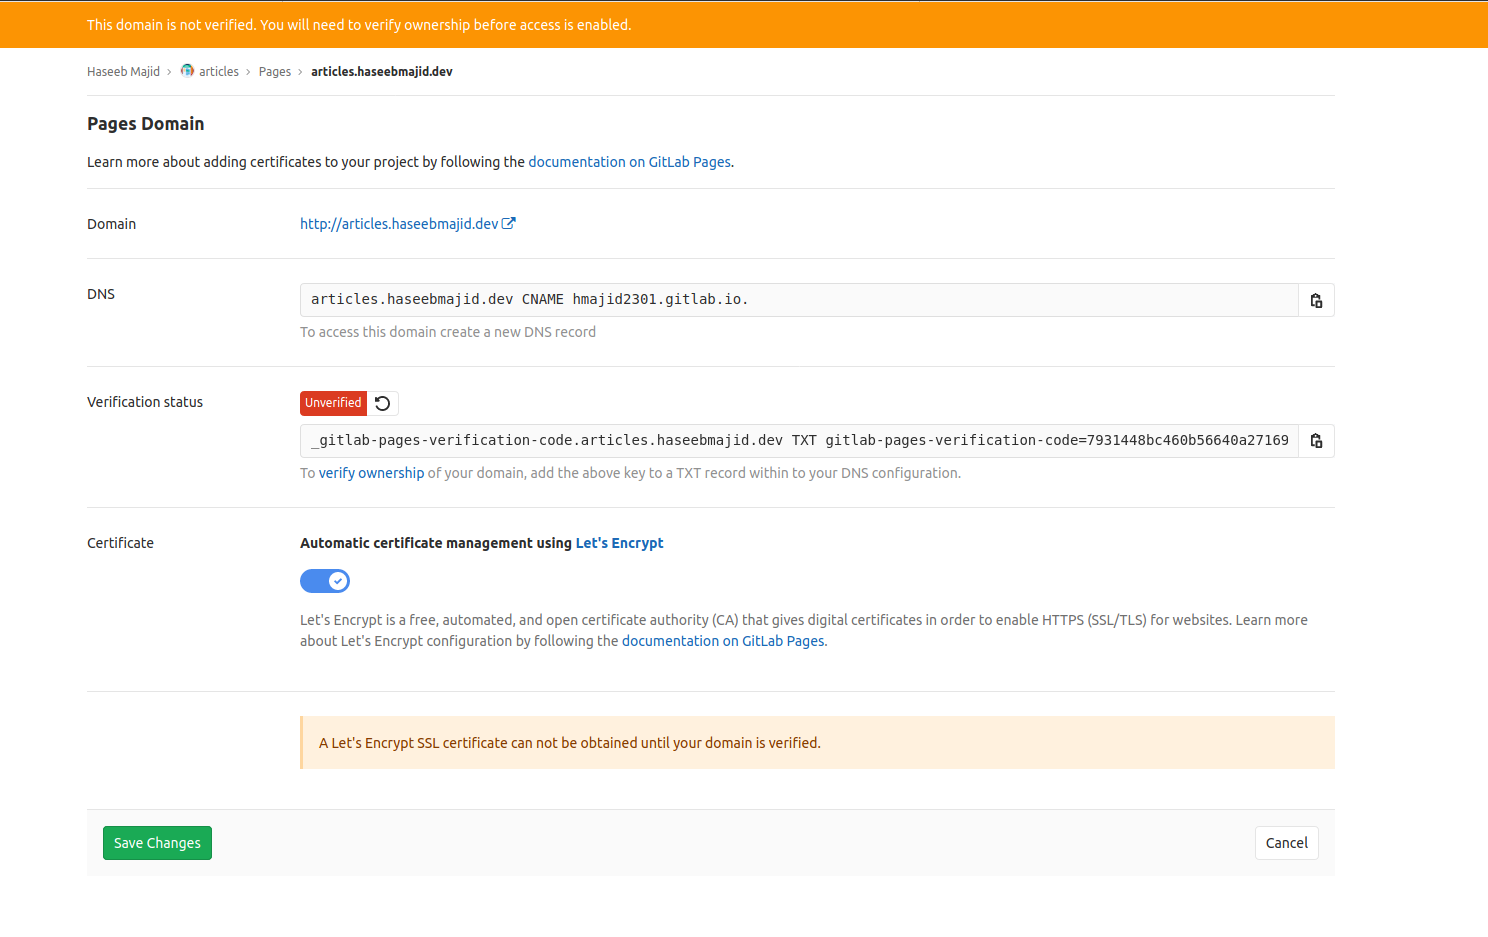
We will now create two DNS records a TXT record which verifies ownership of the domain. Go to settings for “pages”
which can be found https://gitlab.com/<username>/<project_name>/pages. Then copy the data next to
Verification status into your DNS settings.
Next we will create a CNAME record, a CNAME is used to point one domain record to another, i.e. a user comes to
stegappasaurus.haseebmajid.dev CNAME -> hmajid2301.gitlab.io -> Resolve IP Address. Then the browser will take the
user to the correct IP address. You can copy the CNAME data next to the DNS field.
After we’ve added the details it will take a few minutes for verification and for Let's encrypt to create a certificate
for our website. Then you should be able to view your Docz website using both domains listed under the page settings
of your project, i.e the gitlab.io url and your custom domain.
You can find more information here, with regards to Gitlab pages and custom domains.
Note:
.devdomains always needs to be HTTPS encrypted (need a certificate).
Note: For Google Domains this data must be added in the DNS > Custom resource records.
That’s it. We have deployed a docz website using Gitlab CI onto Gitlab Pages and even added our custom domain to it.