On a recent project, I was working on, I wanted to test my web service using docker-compose where I can run and kill Docker containers used by the application and see how my web application reacts to that. In this article, we will go over how you start docker containers using docker-compose from within Gitlab CI.
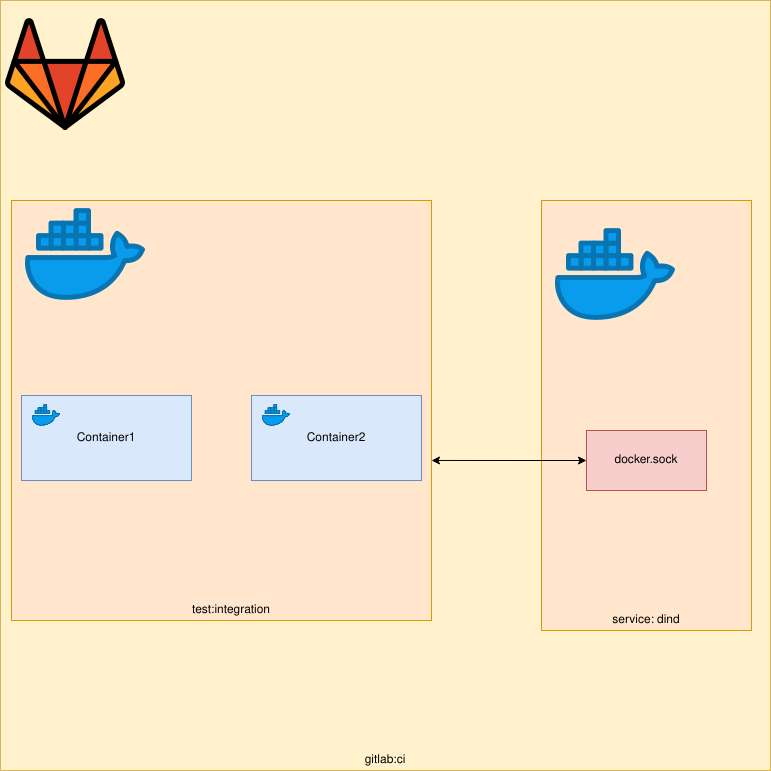
The diagram above is a visualisation of what we are trying to achieve. We want to spawn Docker containers using docker-compose from within our job. The spawning and destruction of these Docker containers will be done via our Python code. We can achieve this by using dind (Docker in Docker). I have written a previous article on this topic which you can read more about here. This article assumes you already somewhat familiar with Docker, docker-compose and Pytest.
This compose file will be used to start our Docker containers.
version: "3"

services:
  service1:
    container_name: container1
    image: docker
    command: ["tail", "-f", "/dev/null"]

  service2:
    container_name: container2
    image: docker
    command: ["tail", "-f", "/dev/null"]
Gitlab CI
Next, we have our .gitlab-ci.yml file, this file is used to tell Gitlab CI what our CI jobs should do.
In this example, we have one job called test:integration which will run our integration tests. But before we do that
we need a way to access the Docker daemon from within Gitlab CI, this can be done by using the docker:dind service.
The docker:dind image automatically using its entry point starts a docker daemon. We need to use this daemon to start/stop our Docker images within CI. The docker:dind (dind = Docker in Docker) image is almost identical to the docker image. The difference being the dind image starts a Docker daemon. In this example, the job will use the docker image as the client and connect to the daemon running in this container.
services:
  - docker:dind

tests:integration:
  stage: test
  image: hmajid2301/dind-docker-compose
  script:
    - pip install pytest docker lovely-pytest-docker
    - pytest -s tests/test_integration.py
The job itself is very simple, it uses a container which already comes with docker and docker-compose. Next we
install the dependencies we need for our tests. Then it runs our tests.
Tests
Now onto our actual tests file. It looks more complicated than it is:
import docker as docker_py
import pytest

docker_client = docker_py.from_env()
docker_compose = None


@pytest.fixture(scope="session", autouse=True)
def docker(docker_services):
    global docker_compose
    docker_compose = docker_services


@pytest.fixture(scope="session", autouse=True)
def setup():
    docker_compose.start()
    yield
    docker_compose.shutdown()


def kill_container(container_name):
    container = get_container(container_name)
    container.kill()
    container.remove()


def get_container(container_name):
    containers = docker_client.containers.list()
    for container in containers:
        if container.name == container_name:
            return container


def start_container(service_name):
    docker_compose.start(service_name)


def test_two_containers():
    containers = docker_client.containers.list()
    assert len(containers) == 2


def test_kill_container1():
    kill_container("container1")
    containers = docker_client.containers.list()
    container1 = get_container("container1")
    assert len(containers) == 1
    assert not container1

def test_start_container1():
    start_container("service1")
    containers = docker_client.containers.list()
    container1 = get_container("container1")
    assert len(containers) == 2
    assert container11
The first part is the setup, we will use the python Docker library,docker. Which allow us to use Python code to
control our Docker daemon. The first @pytest-fixture called docker allows us to use the
lovely-pytest-docker library. To give us a docker_compose object which will allow us to again use Python code to
control our docker-compose.yml file (start-up/stop containers). The library also has some very nice features such
as waiting for containers or executing commands within containers. You can find the available functions
here.
Now we can access the docker_compose object by using our docker_compose global variable.
The reason we have both a library for Docker and docker-compose is because at the moment there is no way to use
lovely-pytest-docker (as far as I’m aware) to stop a single container. So we need to use the standard docker
library to do that. We also use the standard docker library to find out if a container is running.
Next, we have the setup() fixture which we auto use, this means the fixture is run before our test, normally a fixture
would only be called once it has been referred to within another function. In this function, we start both of our containers
in our docker-compose file. This is the same as running docker-compose up --build -d. Next we yield, how exactly the
yield command works I won’t go over in this article, all you have to know is that everything after the yield will only
be run after all of our tests. In this case we teardown our containers (stop them). This is the same as running docker-compose down.
import docker as docker_py
import pytest

docker_client = docker_py.from_env()
docker_compose = None


@pytest.fixture(scope="session", autouse=True)
def docker(docker_services):
    global docker_compose
    docker_compose = docker_services


@pytest.fixture(scope="session", autouse=True)
def setup():
    docker_compose.start()
    yield
    docker_compose.shutdown()
The next part of our file contains some helper functions I’ve written. These functions can be used by multiple tests.
This helps our tests file stay more DRY (do not repeat yourself). You may well want to make these part of a
(helper) class that you expose as a fixture. If you wanted to structure these properly so they can be accessed by
more than one file. Also whilst we are on this topic, we may want to move our fixture to conftest.py, again to allow
other files to use the same fixture we have defined here. But to keep this example simpler we will leave it here.
def kill_container(container_name):
    container = get_container(container_name)
    container.kill()
    container.remove()


def get_container(container_name):
    containers = docker_client.containers.list()
    for container in containers:
        if container.name == container_name:
            return container


def start_container(service_name):
    docker_compose.start(service_name)
Finally, onto our actual tests, in reality, these tests are very boring and not super useful but they should give you an idea what you can do. Such as killing the database container and then check how your Python application responds. Then you can start the database container and again check how your Python application responds. You can read more about how you can test Python Flask applications with pytest here.
So what do our tests do? Well, the first one checks the number of containers running is equal to 2.
The next one kills container1 and checks that only one container is running and it’s not container1.
Our final test starts container1 and checks that it is running and the number of containers running
is back to 2. After this final test has completed then the setup fixture will run its docker_compose.shutdown()
command.
def test_two_containers():
    containers = docker_client.containers.list()
    assert len(containers) == 2


def test_kill_container1():
    kill_container("container1")
    containers = docker_client.containers.list()
    container1 = get_container("container1")
    assert len(containers) == 1
    assert not container1

def test_start_container1():
    start_container("service")
    containers = docker_client.containers.list()
    container1 = get_container("container1")
    assert len(containers) == 2
    assert container1
That’s it we’ve managed to start/stop Docker containers from within Gitlab CI, using DinD. In a future article I will
explain how you could run your tests within a Docker container you’ve started. Say you had three containers nginx, flask
and postgres and you wanted to run your tests within the flask container. But for now that’s it, thanks for reading!